Posts

How to Crochet a Triangle Christmas Tree with the Jasmine Stitch

Image
If you’re looking for a crochet project that’s both quick and visually stunning, the Jasmine Stitch Triangle Christmas Tree is your answer. This charming design uses the puff-like Jasmine Stitch to form a soft, textured triangle perfect for holiday décor. Whether you’re a seasoned crocheter or an enthusiastic beginner, this project will guide you through the process while adding festive flair to your crafting. What You’ll Need Yarn: Green (tree) and brown (trunk) in cotton or acrylic. Feel free to experiment with scraps! Hook: 2.5 mm crochet hook (adjust if needed for your yarn thickness). Extras: Tapestry needle for finishing, optional embellishments like buttons or ribbons. Understanding the Jasmine Stitch The Jasmine Stitch involves creating puff stitches that are connected into a star-like pattern. Each “petal” of the stitch is built by repeatedly pulling up lo...

The Ultimate Gingerbread House Crochet Pattern: A Sweet Holiday Project! 🏠

Image
Hey crochet enthusiasts! Ready to whip up the most adorable holiday decoration ever? Let's dive into this charming gingerbread house pattern that's perfect for both beginners and experienced hookers. Trust me, this little architectural masterpiece will have everyone asking, "Wait, that's crochet?!" Materials You'll Need 🧶 Cotton yarn in your chosen colors (house color, trim, decorations) 2mm crochet hook (Pro tip: going smaller than recommended creates tighter, neater stitches!) Stuffing/poly-fill Tapestry needle Scissors Your favorite holiday playlist (optional but recommended! 🎄) Skill Level Beginner-friendly! If you can chain and single crochet, you're golden! Special Notes About Gauge Here's a clever trick: Using a 2mm hook instead of the recommended 3.5mm creates a tighter, more polished finish with no peek-a-boo holes. Remember, we're building a house here, not a mesh bag! The Pattern Breakdown House Walls (Make ...

Unboxing & Review: Affordable Knitting Needle Set from Temu – Quality, Value, and Usability

Image
Welcome, yarn lovers! Today, I’m excited to review a new knitting needle set from Temu that I ordered. As a crochet enthusiast, I hesitated before purchasing, but I didn’t want to break the bank on a knitting set. After seeing the affordable price and promising reviews, I decided to give it a go! Join me as I unbox the set, share my first impressions, and give you the scoop on whether this budget-friendly knitting set is worth adding to your crafting collection. Why I Chose This Set I focus mostly on crochet, but I’ve been wanting to add knitting projects to my channel. Investing in high-quality knitting needles can be expensive, so I decided to try this set from Temu, priced at around €30. This isn’t the cheapest option, but it’s definitely affordable for a comprehensive set. Unboxing and First Impressions The package was small but surprisingly sturdy, so I was eager to open it. Here are my initial thoughts: Aesthe...

Easy DIY Crochet Christmas Ornaments: Wreath and Candy Cane

Image
Crocheting your own Christmas decorations adds a handmade touch to your holiday decor, and these simple wreath and candy cane ornaments are perfect for beginners. Here's a detailed written pattern based on the video tutorial. Materials Needed: - Yarn of your choice (festive colors like red, green, or white) - Crochet hook (use a size that suits your yarn) - Scissors - Tapestry needle (for weaving in ends) Crochet Pattern for the Wreath & Candy Cane: 1. Begin with a Slip Kno t: Start by making a slip knot and place it on your crochet hook. 2. Chain 40 : For a wreath of approximately 5 cm diameter or a candy cane of 7 cm length, chain 40. Adjust the number of chains for larger or smaller ornaments. 3. Single Crochet (SC) in the Second Chain from Hook :    - Skip the first chain.    - Insert your hook into the second chain, yarn over, and pull through (you now have two loops on the hook). Yarn over again and pull through both loops.  4. Three Single Crochets in...

Crochet Your Own Fruity Hot Pads: A Fun Summer DIY Project

Image
Are you looking for a cute and practical crochet project to brighten up your kitchen this summer? Look no further! Today, we'll walk you through creating adorable fruit-inspired hot pads. These versatile crochet pieces can be customized to resemble various fruits like watermelon, lemon, lime, or orange. Let's dive into this easy and fun pattern! Materials Needed: - Cotton yarn in colors of your choice (main fruit color, white for rind, black for seeds if making watermelon) - Crochet hook size H (or size appropriate for your yarn) - Tapestry needle - Scissors Abbreviations: - ch = chain - dc = double crochet - st(s) = stitch(es) - sl st = slip stitch Pattern: Note: This pattern creates one circular side of the hot pad. You'll need to make two identical pieces and join them together. Round 1: Start with a magic ring. Ch 3 (doesn't count as first dc), make 12 dc into the ring. Sl st to the top of the beginning 1dc to join. (12 dc) Round 2: Ch 3 (doesn't count as a stit...

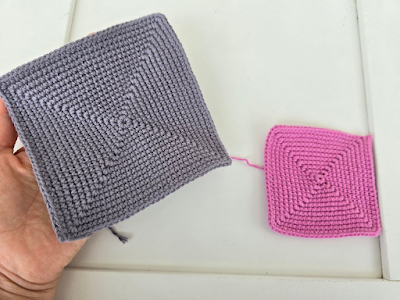
How to Crochet a SOLID GRANNY SQUARE: Easy Beginner-Friendly Pattern

Image
This pattern creates a seamless and flat square with a unique geometric design. It is perfect for beginners as it uses only single crochet stitches and an increase of three to form the square shape. You can use any type of yarn and a matching hook to create squares of your desired size.  Materials: - Yarn of your choice (the video uses cotton yarn) - Crochet hook that matches your yarn size Abbreviations: - sc - single crochet - st - stitch - ch - chain - sl st - slip stitch - mc - magic circle/ring - rep - repeat Special Stitch: - Increase of three: work 3 single crochet stitches into the same stitch Instructions: **Step 1:** Start with a magic circle. Ch 1, work 8 sc into the magic circle. Pull the tail to close the circle tightly. **Step 2:** Row 2: Work an increase of three into the first st, sc in the next st. *Increase of three in the next st, sc in the following st.* Rep from * to * around. You should have four sets of increases, forming the four corners of the square. Do no...

How to crochet a perfect heart for beginners.

Image
The heart is quick and simple. You can use any yarn and a matching hook. The heart consists of two halves that you crochet separately and then join together. After you join the two halves, crochet around until you arrive to the other half and 4 stitches are left, skip 4 stitches on another half and insert your hook into 5th stitch keewp crocheting around until you have 8 stitches in total. Later make rows of decreases until you have 8 stitches. Then make a row of decreases in each stitch and sew the hole with a needle. The decreases must be done on the both sides of the heart. In total, you will have two decreases separated by 1 single crochet. HERE THE VIDEO TUTORIAL: