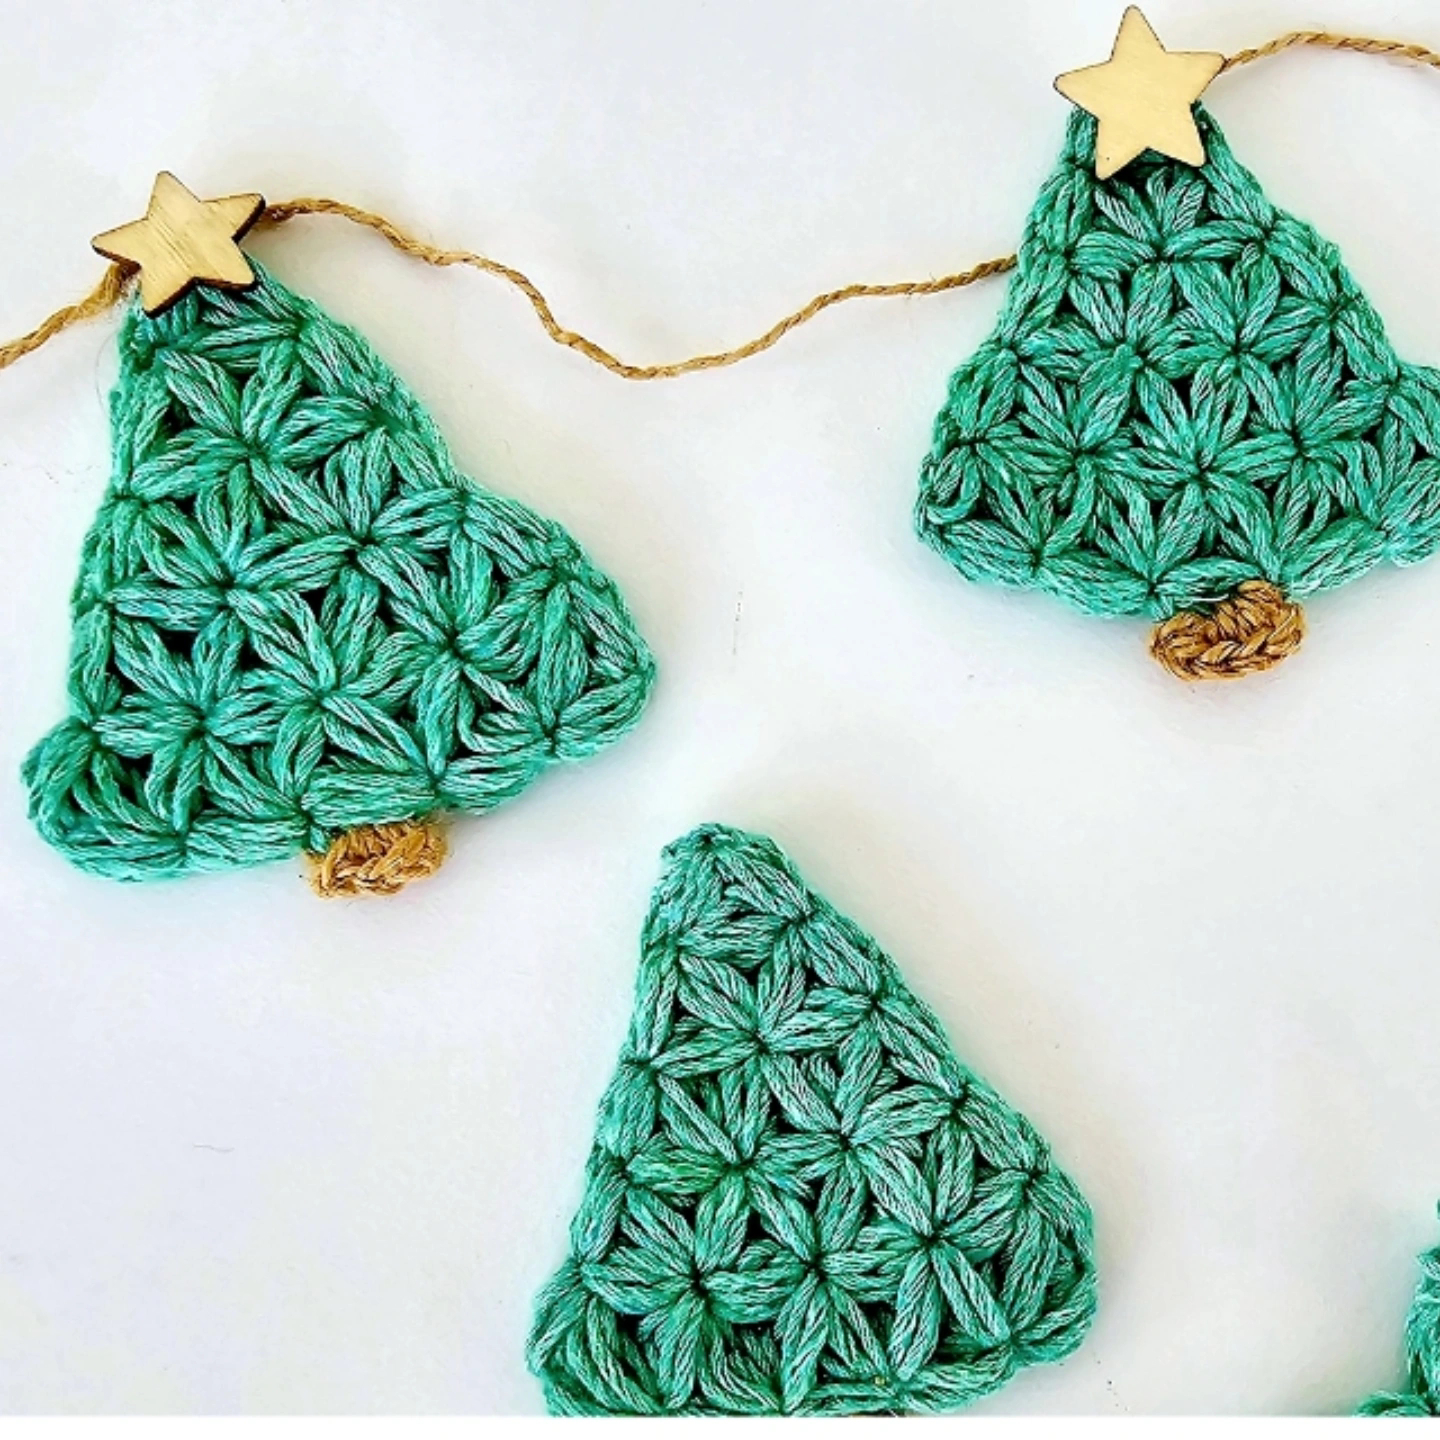
How to Crochet a Triangle Christmas Tree with the Jasmine Stitch
If you’re looking for a crochet project that’s both quick and visually stunning, the Jasmine Stitch Triangle Christmas Tree is your answer. This charming design uses the puff-like Jasmine Stitch to form a soft, textured triangle perfect for holiday décor. Whether you’re a seasoned crocheter or an enthusiastic beginner, this project will guide you through the process while adding festive flair to your crafting.

What You’ll Need
- Yarn: Green (tree) and brown (trunk) in cotton or acrylic. Feel free to experiment with scraps!
- Hook: 2.5 mm crochet hook (adjust if needed for your yarn thickness).
- Extras: Tapestry needle for finishing, optional embellishments like buttons or ribbons.
Understanding the Jasmine Stitch
The Jasmine Stitch involves creating puff stitches that are connected into a star-like pattern. Each “petal” of the stitch is built by repeatedly pulling up loops, giving the design its iconic texture. Let’s get into the details!
Crochet Pattern: Jasmine Stitch Triangle
Step 1: Create the Base
- Slipknot and Chain 1: Start with a slipknot, then make one chain. Pull this chain slightly longer than usual.
- First Puff Stitch:
- Yarn over, insert the hook into the chain space, and pull up a loop. Repeat this three times, creating eight loops on your hook.
- Hold the working yarn with your thumb and pull through all eight loops.
- Secure with a chain stitch.
- Chain 1: This sets the spacing for your next puff stitch.
- Repeat Puff Stitches: Work a total of five puff stitches into the base row. This will form the foundation for your triangle.
Step 2: Build the Triangle
- Row 2 (Start with 2 Petals):
- Begin with a puff stitch in the first space (like the base row).
- In the next puff space, create two incomplete puff stitches (start them but don’t finish). Pull through all loops on the hook, joining the two puffs into a single stitch.
- Middle of the Row (Three Petals):
- In each subsequent puff space, work a set of three incomplete puff stitches before pulling through all loops and securing. This forms a star-like cluster of “petals.”
- Move to the next space and repeat.
- End the Row (Three Petals): Finish the row with three petal clusters.
Step 3: Continue Rows
Each row starts with two petal clusters and ends with three petal clusters. The pattern reduces the number of puffs as you move upward, forming a triangle.
Important Tips:
- Always pull up your loops evenly to maintain consistent tension.
- Use your thumb to hold the working yarn at the base of your loops, ensuring stability.
- Practice patience—while it looks intricate, the Jasmine Stitch becomes easier with repetition!
Step 4: Final Rows
As you near the top, the rows will naturally taper off. The very last row will consist of just two petals, forming the triangle’s peak.

Edging and Trunk
Edging (Optional):
For a polished look, work a round of single crochet stitches around the triangle. Add three single crochets at each corner for a neat turn.
Trunk:
- Attach brown yarn at the center bottom.
- Work four single crochets across for the trunk’s width.
- Chain 1, turn, and continue for 2–3 rows or until your desired trunk height.
- Finish off and weave in all ends.
Finishing Touches
Your Jasmine Stitch Triangle is complete! Decorate it with bows, buttons, or keep it minimalist. Use these trees as gift tags, ornaments, or garland pieces—the possibilities are endless.

Why You’ll Love This Project
The Jasmine Stitch Triangle Christmas Tree is not only a joy to make but also an ideal way to use up leftover yarn. Its versatility allows you to adapt the design to suit any holiday theme. So, grab your hook and yarn, and bring some handmade warmth to your festivities!
Happy Crocheting! 🎄


Comments
Post a Comment